T6.1 Upper Bed Hinge - DIY FIX

Mattsv

Mattsv

VIP Member
Messages
235
Location
South Coast
Vehicle
T6.1 Coast 150
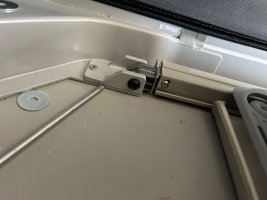
Like a few others, I learnt the hard way this weekend that leaving anything on the ledge below where the bed hinges, results in the plastic bracket snapping.

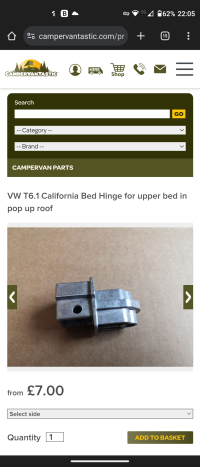
I managed to source a new bracket from Campervantastic which arrived very quickly and only cost £8 plus delivery. Upper Bed Hinges

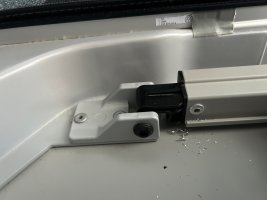
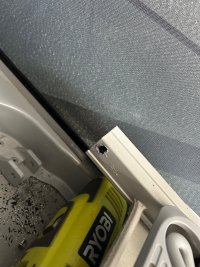
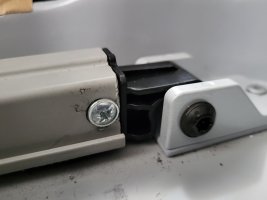
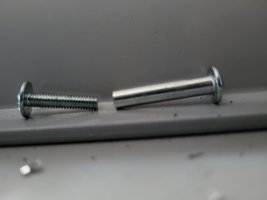
Hardest bit was drilling out the old rivet - needed a bit of persuading but not too bad. Slid the old clip out (undid the torx bolt on the bracket to make it easier) and fixed the new bracket using a cabinet joining bolt rather than a rivet.

Straight forward job, no need to remove pop top at all. Left a couple of tiny marks on the frame but no one will ever see them under the mattress. Might have been covered under warranty easy enough job to DIY - if you can drill out a rivet then it is easy to do :)
20220420_132541.jpg

20220420_132659.jpg
 
Last edited:
This just happened to us. Anyone know a temporary fix? Currently away for the next three nights.
 
Like a few others, I learnt the hard way this weekend that leaving anything on the ledge below where the bed hinges, results in the plastic bracket snapping.

I managed to source a new bracket from Campervantastic which arrived very quickly and only cost £8 plus delivery. Upper Bed Hinges

Hardest bit was drilling out the old rivet - needed a bit of persuading but not too bad. Slid the old clip out (undid the torx bolt on the bracket to make it easier) and fixed the new bracket using a cabinet joining bolt rather than a rivet.

Straight forward job, no need to remove pop top at all. Left a couple of tiny marks on the frame but no one will ever see them under the mattress. Might have been covered under warranty easy enough job to DIY - if you can drill out a rivet then it is easy to do :)
View attachment 92082

View attachment 92083
Hi this has happened to me I have managed to remove the rivet on one side but can‘t remove the rivet next to the pop top as it is too close to the canvas to use a drill how did you manage to remove this rivet
 
Hi this has happened to me I have managed to remove the rivet on one side but can‘t remove the rivet next to the pop top as it is too close to the canvas to use a drill how did you manage to remove this rivet
It was a combination of drilling (from the end you can get to) and using a punch and hammer. Bit of a PITA and needs a bit of patience. Good luck.
 
It was a combination of drilling (from the end you can get to) and using a punch and hammer. Bit of a PITA and needs a bit of patience. Good luck.
They did mine under warranty, but I guess you are too far down the road now.
 
It was a combination of drilling (from the end you can get to) and using a punch and hammer. Bit of a PITA and needs a bit of patience. Good
Shockwave Impact Duty Right Angle Attachment, Right Angle Drill Attachment, Drill Accessory, 90 Degree Angled Drill Adapter, ABS Handle Power Tool Parts Electric Screwdriver Repair https://www.amazon.co.uk/dp/B09JLYH9TJ/?tag=unique09f-21

I used this attachment on my drill so I could get access the the other side worked like a dream all fixed now thank you for your reply
 
Like a few others, I learnt the hard way this weekend that leaving anything on the ledge below where the bed hinges, results in the plastic bracket snapping.

I managed to source a new bracket from Campervantastic which arrived very quickly and only cost £8 plus delivery. Upper Bed Hinges

Hardest bit was drilling out the old rivet - needed a bit of persuading but not too bad. Slid the old clip out (undid the torx bolt on the bracket to make it easier) and fixed the new bracket using a cabinet joining bolt rather than a rivet.

Straight forward job, no need to remove pop top at all. Left a couple of tiny marks on the frame but no one will ever see them under the mattress. Might have been covered under warranty easy enough job to DIY - if you can drill out a rivet then it is easy to do :)

View attachment 92082

View attachment 92083
What size cabinet joining bolt did you use?
 
Do you have the part number for the hinge? Broke mine last night....
 
I have the same problem. the plastic end piece broke due to wife pulling the bed down with a loo roll underneath. Never knew she was that strong... I have ordered both parts from campervantastic at £8.50 each and will have a go over the weekend. Will let you know how I get on. I may as well change both as the other will probably go. I am hoping the the metal replacement is a straight swap and I do not need to change the base bracket as well.
 
I ordered both brackets from Campervantastic. They are different from the original plastic ones and are handed left and right. I was going to do both but decided on the broken only. I will keep the other in case.

You can drill out the rivets from the bed side, You will run into trouble on the other side rivet and you will end up with a bigger hole or small holes on the other side. Take your time and you should be ok.

You can also raise the bed. I put it on a piece of 4x4 wrapped in an old curtain and was able to get better access to the rivets after I realised I could unbolt the bracket that is on the frame and lift the bed. Lifting the bed is easier and I found this after faffing about with the drill.

Make sure the gap at the end of the bed over the passenger seat is the same as the drivers.I used a masonry chisel as this was as close to the gap as I could get and it was not going to move. The Torx bolt hole is slightly longer from the back of the bracket in the bed rail. I measured 25mm required hence the bracket protrudes a bit fro the bed rail. I used the existing bracket as it is riveted but you could put a new bracket in which would be snug
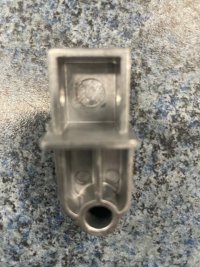
I marked the new hole in the bracket with a punch and drill with a 3.3mm. The hole is marked on the bracket and is quite easy to do.
I used a M4 x 30mm Allen screw with a nylon nut to secure it. If you need to use washers you will need a 40mm screw.

Easy to do if you are a diyer if not get a garage to do it for you. There is no need to remove the bed or pop top. It took me two hours but could be done sooner. I also opened all of the windows in the pop top to give me more light. The new bracket is a tight push fit with the aid of a hammer. it will only go in one way.

Drill a 3.3mm hole through the circle shown here.IMG_2763.jpeg
Image 4.jpeg

IMG_2765.jpegIMG_2767.jpegIMG_2768.jpeg
Its not going anywhere now.
 
Hi, my friend recently did it to my van! Seems common and I was looking around for the part and apparently the replacement from dealers is a metal one as above with the hole for the rivet top to bottom rather than sideways. Dealer say they want £144 to "diagnose" my problem (I am out of warranty) and then charge parts and labour. Has anybody done this at a dealer and paid for it? Can one guess how much it will cost?

This seems a bit cheap?

I pulled instructions below from a German site which I think might be the way the dealers do it.
Procedure: (google translated)
  • Raise the roof bed about 10 cm so that you can access the two (left and right) lower bearings of the gas pressure dampers
  • Remove the lower clamps of the gas pressure dampers and unhook the dampers (the dampers extend several centimeters in the process, so be careful with your fingers).
  • Place the roof bed back down again
  • Climb up into the bed, taking tools with you (25 Torx and 10mm wrench)
  • Remove the through-bolt of the still intact hinge
  • The bed frame now rests loosely, without tension, in its place. All four attachment points have now been removed (gas pressure dampers left and right, right hinge screw removed, left hinge broken).
  • Now lightly tie the loose dampers to the bed frame or secure them with adhesive tape so they don't dangle.
  • Completely open the large front window opening
  • Place a piece of timber or similar across the front (in the area in front of the Place the top light switches so that you can put the bed frame down if necessary while lifting it out (see Photo 2).
  • Remove the bed frame from the front.
  • Now drill out the two rivet heads on the removed bed frame. You only need to drill about 2 mm so that the rivet plates are removed.
  • Push the remaining rivets inward with a punch (a small screwdriver also works).
  • Pull out the plastic hinge and remove the remaining rivets from the frame, as they would otherwise roll back and forth while driving.
  • Insert the new metal hinge.
  • According to VW, the new hinge will be riveted again, but not on the right and left, but on the top and bottom. This would require additional holes to be drilled in the bed frame.
  • I decided to use the old holes (left and right) and, with the new hinge inserted, drill through the new hinge once.
  • Instead of the rivets, I now have a A continuous M5 screw was installed. This means that the hinge can now be replaced again and again within a few minutes, even with the bed installed.
  • The bed frame is now installed in reverse order.
I noticed the solution in this forums photo has a gap between the new hinge and bed pole.

Thanks, Dave
 
Back
Top