Roof conversion hydraulic >> manual

Hi everyone!

I finished my conversion this weekend and wanted to share some thoughts with you.

Long story short, just follow Dumé's instructions (with a pinch of salt of course) and you'll be fine!

A few figures:
  • Cost of material approximately 1500€ for all of the original VW parts bought with the help of my neighbour's garage, stainless steel bolts, washers and nuts, sealant/glue, etc.
  • It took me around 12 hours of work including building the support structures to hold my roof up, removing a broken rusty bolt, degreasing the roof channels because of the oil leak (thankfully the canvas was not affected), electrical works, sealing/glueing everything, etc.
  • I'm sure it can be done faster, but I was working in the afternoons after work in front of my garage, so could only work somewhere between 17.30-20.00.
Some notes to consider:
  • Build two strong support structures, one around 400mm high, and the other around 1000mm high to hold your roof while you work on it. It is best to have both of them ready and swap them as needed.
  • I had to lower the roof every day after I finished to be able to drive to work the next day (my wife needed the other car the whole week which rarely happens - #murphy) so the first day had to include the removal of the hydraulics+installation of the locking mechanism.
  • My wife was the positioning engineer for the support structures while I held the roof up
  • Before the conversion, one of the cylinders on our Cali failed completely. To be able to lift the roof and start with the work, I had to depresurise the system, by turning the emergency screw on the hydraulic pump. Works without issues, just browse this forum for instructions if you do not know where it is.
Electrical works:
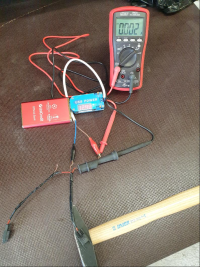
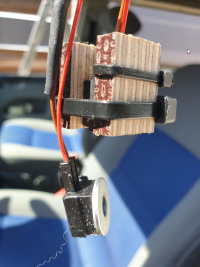
  • The latest update of the Dumé's manual suggests disabling the roof function on the control unit and bypassing the sensors for the roof position this way. Our Cali is 2005 and does not support this option. I had to bypass the sensors to let my van believe that the roof was closed.
  • If I am not mistaken, the sensors installed are Hall sensors. The control unit receives analogue signal, according to my measurements 2-3mA when a metal item is close to the sensor and 13mA when it is not. This is quite a nicely engineered concept since there are no false positive or negative inputs. The values that the control unit »reads« need to be inside a certain threshold for the unit to read it as open or closed. Anything else is a broken sensor and a returned error.
  • (Thereis a nice thread about the sensor here: https://vwcaliforniaclub.com/threads/roof-code-1000.34527/post-553895)
  • I plan to replace the sensors with suitable resistors to tidy the whole thing, but we are off to Corsica on Friday, so the temporary solution will have to do for now.
  • If anyone is interested, I can post how that went as well
So, first, Dumé, if you ever read this, thank you once again for putting the instructions together! Without you, I would be bugging innocent people in the nearest campsite, asking them if I could measure the positions of their roof mechanism.

Second, go for the conversion guys if you are not comfortable about your roof hydraulics. If anyone can use my experience gained through my conversion, I will be happy to help!

Best, Jaka
2023-09-11 22_18_22-Window.png

2023-09-11 22_18_43-Window.png

2023-09-11 22_18_56-Window.png
 
Bonjour à tous,

J’ai découvert ce site par le site collectif calif (T5 calif) et j’ai besoin de votre aide.

Je suis face à un problème avec mon toit électrique qui détecte un toit ouvert alors qu’il est fermé et qui ne veut plus s’ouvrir donc... Depuis le début, je ne suis pas serein avec ce toit électrique et je souhaiterais donc le passer en toit manuel.

Je sollicite donc votre aide pour avoir le tuto que Dumè a réalisé permettant cette manipe et éventuellement des photos du résultat après (intérieur, notamment les points de fixation)

Mon Véhicule est un T6 coast 150ch de 2017

Merci beaucoup par avance de l’aide que vous pourriez m’apporter

Bien cordialement.
Jean-Philippe
 
If anyone can help me on this subject, that would be highly appreciated. Our hydraulic system is no longer raising the roof, and the most long-term reliable system is the manual one. Many thanks for any help provided! Willem
 
Hi All,

Sorry to pick up an old thread.

Our hydraulic ram on the left hand side of the vehicle unfortunately exploded whilst on our European trip, not ideal, but a couple of ratchet straps and we managed to make the second half of the trip. It’s a 2007 California so would rather not spend the money on new rams and sensors and go manual if possible.

I’ve emailed Dume but the emails come back to say the inbox is no longer monitored.

I can see Dume hasn’t been on the forum since October 2023. Has any of the above people had any contact with Dume since he shared them the documents (noting his request for the copyright etc) so I can get the pdf document from him at all?
I wouldn’t worry about swapping the damaged ram to a new one. It’s not a difficult job to do on your own at home. A revised ram was made from 2008 and have been modified to stop the end caps from failing under excessive heat. VW’s fix back then before the new rams were available was to cover the black plastic ram housing with heat reflecting tape and drill a couple of holes in the cap as well. There is no need to swap the sensors either unless that’s another issue you have with your roof. Just order a new ram and the correct hydraulic fluid from VW or TPS if you are in the uk. IMG_6767.jpeg
 
Hi, is it possible to get a copy of the conversion tutorial ?
Thank you !

Max
 
Hi anyone have the pdf document or the steps to do that, i send email but give me not enymorte.....could be nice, my roof is ok but i really want change to manual like california beach.
 
Hi everyone!
Does anyone have the PDF of the manual?
Thank you so much!
 
Hi everyone!

I finished my conversion this weekend and wanted to share some thoughts with you.

Long story short, just follow Dumé's instructions (with a pinch of salt of course) and you'll be fine!

A few figures:
  • ...................................................................
Hi!
Do you have the PDF of the manual?
Thank you so much!
 
Hello everybody,
I Need conversion manual. Please share It again.
Thanks a lot!!

Enrico
 
Thanks for the emailed manual. It's excellent and very detailed. I will keep it until the day comes when my roof gives up, hopefully a while yet.
Again thanks for sharing.
Hello man, can you share manual? I would appreciate so much. Thanks a lot.
 
Hi everyone!

I finished my conversion this weekend and wanted to share some thoughts with you.

Long story short, just follow Dumé's instructions (with a pinch of salt of course) and you'll be fine!

A few figures:
  • Cost of material approximately 1500€ for all of the original VW parts bought with the help of my neighbour's garage, stainless steel bolts, washers and nuts, sealant/glue, etc.
  • It took me around 12 hours of work including building the support structures to hold my roof up, removing a broken rusty bolt, degreasing the roof channels because of the oil leak (thankfully the canvas was not affected), electrical works, sealing/glueing everything, etc.
  • I'm sure it can be done faster, but I was working in the afternoons after work in front of my garage, so could only work somewhere between 17.30-20.00.
Some notes to consider:
  • Build two strong support structures, one around 400mm high, and the other around 1000mm high to hold your roof while you work on it. It is best to have both of them ready and swap them as needed.
  • I had to lower the roof every day after I finished to be able to drive to work the next day (my wife needed the other car the whole week which rarely happens - #murphy) so the first day had to include the removal of the hydraulics+installation of the locking mechanism.
  • My wife was the positioning engineer for the support structures while I held the roof up
  • Before the conversion, one of the cylinders on our Cali failed completely. To be able to lift the roof and start with the work, I had to depresurise the system, by turning the emergency screw on the hydraulic pump. Works without issues, just browse this forum for instructions if you do not know where it is.
Electrical works:
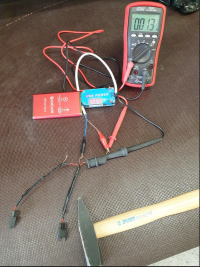
  • The latest update of the Dumé's manual suggests disabling the roof function on the control unit and bypassing the sensors for the roof position this way. Our Cali is 2005 and does not support this option. I had to bypass the sensors to let my van believe that the roof was closed.
  • If I am not mistaken, the sensors installed are Hall sensors. The control unit receives analogue signal, according to my measurements 2-3mA when a metal item is close to the sensor and 13mA when it is not. This is quite a nicely engineered concept since there are no false positive or negative inputs. The values that the control unit »reads« need to be inside a certain threshold for the unit to read it as open or closed. Anything else is a broken sensor and a returned error.
  • (Thereis a nice thread about the sensor here: https://vwcaliforniaclub.com/threads/roof-code-1000.34527/post-553895)
  • I plan to replace the sensors with suitable resistors to tidy the whole thing, but we are off to Corsica on Friday, so the temporary solution will have to do for now.
  • If anyone is interested, I can post how that went as well
So, first, Dumé, if you ever read this, thank you once again for putting the instructions together! Without you, I would be bugging innocent people in the nearest campsite, asking them if I could measure the positions of their roof mechanism.

Second, go for the conversion guys if you are not comfortable about your roof hydraulics. If anyone can use my experience gained through my conversion, I will be happy to help!

Best, Jaka
Hello again!

After successfully converting my roof from hydraulic to manual two years ago, I decided it was finally time to replace the canvas as well.

Being almost 20 years old, the original canvas had endured plenty of sun, rain, wind, and UV exposure — I have to say, I’m genuinely impressed by how well it held up!

Video tutorials
There are some great videos on YouTube that show the replacement process:
https://www.timetoride.de/reiseplanung/vw-bus-reise-tutorials/

Part number and some specifics related to my originally hydraulic roof now being a manual one

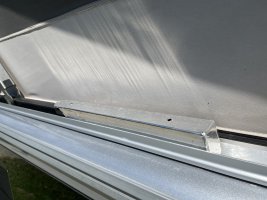
Since my roof was originally hydraulic, I had to remove the side springs during the conversion to make it possible to fold the canvas and close the locking mechanism.
I was also not able to find reliable information online whether the cavas for the hydraulic and manual roof were shaped exactly the same.

Kernow transporters gave me a few very valuable tips for the replacement and adviced on the part number as well (thank you!!).
  • You need to knock in the seal. We use 10mm wood block
  • Push in buy hand first.
  • On the rubber there will be marks that align with the joins in the aluminium channel.
  • Put the front end in securely then pull it back to align the rear. Then you have it square.
  • Syca in each corner at the top.
  • On manual roof we put a ratchet strap through the bar in roof and secure to a seat base. Then you have enough slack to fit
The part number I used is 7LA 875 059 R 7MH, with 061S being the revision number.
Note: the “061S” can only be found on the small label tag that comes with the canvas.

This is the manual version of the canvas, meaning the side springs are positioned slightly further back to allow the locking mechanism to work correctly.

The new canvas is a nice charcoal grey, with a front window and the option to fully open the front panel.

A few facts and figures
  • Price: about €950 for the genuine VW canvas (thanks to my neighbour who runs a VW garage).
  • Installation time: roughly three hours to remove the old one, clean the rail, and fit the new canvas — working at a relaxed pace.
  • Fit: the manual version fits my converted roof perfectly and keeps it nicely tight — even better than the old one.
  • Quality: the new canvas is noticeably thicker and more robust, likely offering better insulation and a darker upper sleeping area.

Hope this helps, if anyone’s considering doing the same!
Best, Jaka

20250927_120529.jpg

20250927_123319.jpg

20251006_165002.jpg
 
Back
Top