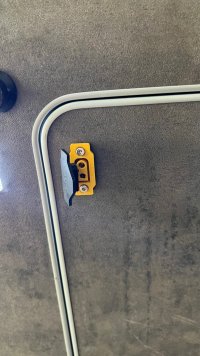
how to remove the VW t6.1 ocean rear boot RHS panel

A

akprincehbd

Messages
42
Location
london
Vehicle
T6.1 Ocean 204 4 motion
Hello,
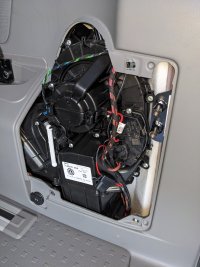
I want to install an Anderson/XT60 plug here in the boot area in the marked panel area, anyone know how can I remove this panel?
I know it's easier to do it on left wardrobe side but I don't want to damage or drill the wardrobe, and as there is already a cig socket on right hand side so wiring is already there but small current I guess. It's should be enough for my usage.

Thanks
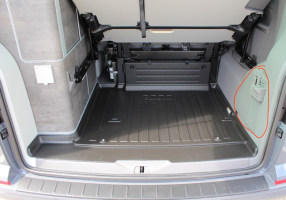
image (1).png
 
I don't know I'm afraid but where did you get that floor protector, please? Looks great.
 
Co-incidentally I need to remove that panel also to see if the 12v socket is actually connected as it's not working and fuses are ok. I believe you need a T30 Torx driver to remove the two bolts holding the shelf support then the panel itself is on clips so you need something like a plastic trim removal tool to pop the panel out. Please let us know how you get on!
Thanks, I will try!
 
Post in thread '12v Socket in boot area' https://vwcaliforniaclub.com/threads/12v-socket-in-boot-area.11535/post-455877

This was for a T6.

By wedging a piece of timber between the wheel arches it was possible to bend out the bottom of the panel sufficiently to get access to the 12 volt socket. If the metal clips pull apart they are very difficult to relocate.
Thanks - yes, I'd seen that one. Plan is to see if I can see the cable to the socket and if it's not connected just tap into that and bring a supply out from under the panel. Just a bit nervous about creating problems with clips, hence the cautious approach!
 
The rear A/c gubbins are under that panel , on a Beach / Caravelle etc T6 there is an access panel that simply clips in

In the absence of of any other replies :

I don't know for sure but I would imagine it's a similar affair to other VW transporters etc .
IMO you remove the bed support screw and bracket and give the whole trim panel that wraps around (not the flat vent) a tug from the bottom back edge. (Rear of the van)

LLL parts website contains exploded part's diagrams that may assist in identifying the part number and drawings which should help.

You can then Google tge part number of the cover panel which should show photos of how it locates (I suspect it clips into metal recess in the wider panel via plastic tang on the infill panel )

Report back to help others
 
Last edited:
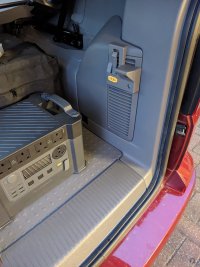
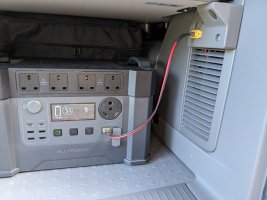
I have mounted an XT60 into the plastic cover and metal bed/shelf support which is bolted (torx heads) through the grill area of the rear cover. See photos. The plastic cover can be cut with a hole to mount the XT60 and the cabling can be taken through the grill.

Once the bracket is removed the panel comes off easily with a little leverage. I started at the top front and worked round. There is a wiring loom under the cover which includes the feed for the 12V sockets in the rear off-side area (under the bed and by the sliding door. The wiring diagram giving colours etc is in the resources section.

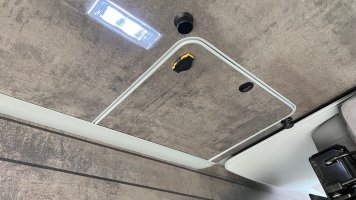
The reason for fitting the XT60 socket in my case was to connect power from a roof mounted solar panel to charge a battery/invertor power station that lives in this area when we are travelling.

When I get chance I'll post more about the various projects I have undertaken over the last few months since we have had the van.

PXL_20250502_184957718.jpg

PXL_20250514_201351652.jpg

PXL_20250516_164142373.jpg
 
I have mounted an XT60 into the plastic cover and metal bed/shelf support which is bolted (torx heads) through the grill area of the rear cover. See photos. The plastic cover can be cut with a hole to mount the XT60 and the cabling can be taken through the grill.

Once the bracket is removed the panel comes off easily with a little leverage. I started at the top front and worked round. There is a wiring loom under the cover which includes the feed for the 12V sockets in the rear off-side area (under the bed and by the sliding door. The wiring diagram giving colours etc is in the resources section.

The reason for fitting the XT60 socket in my case was to connect power from a roof mounted solar panel to charge a battery/invertor power station that lives in this area when we are travelling.

When I get chance I'll post more about the various projects I have undertaken over the last few months since we have had the van.
That’s a brilliant mod. Look forward to hearing what else you have have done :thumb
 
I have mounted an XT60 into the plastic cover and metal bed/shelf support which is bolted (torx heads) through the grill area of the rear cover. See photos. The plastic cover can be cut with a hole to mount the XT60 and the cabling can be taken through the grill.

Once the bracket is removed the panel comes off easily with a little leverage. I started at the top front and worked round. There is a wiring loom under the cover which includes the feed for the 12V sockets in the rear off-side area (under the bed and by the sliding door. The wiring diagram giving colours etc is in the resources section.

The reason for fitting the XT60 socket in my case was to connect power from a roof mounted solar panel to charge a battery/invertor power station that lives in this area when we are travelling.

When I get chance I'll post more about the various projects I have undertaken over the last few months since we have had the van.

View attachment 136876

View attachment 136877

View attachment 136878
Hi, Thanks for the detailed picture! BTW you can get a xt60 female protect cap for this kind of socket, the cover can flip to cover it when it's not in use and its black color.
 
I have mounted an XT60 into the plastic cover and metal bed/shelf support which is bolted (torx heads) through the grill area of the rear cover. See photos. The plastic cover can be cut with a hole to mount the XT60 and the cabling can be taken through the grill.

Once the bracket is removed the panel comes off easily with a little leverage. I started at the top front and worked round. There is a wiring loom under the cover which includes the feed for the 12V sockets in the rear off-side area (under the bed and by the sliding door. The wiring diagram giving colours etc is in the resources section.

The reason for fitting the XT60 socket in my case was to connect power from a roof mounted solar panel to charge a battery/invertor power station that lives in this area when we are travelling.

When I get chance I'll post more about the various projects I have undertaken over the last few months since we have had the van.

View attachment 136876

View attachment 136877

View attachment 136878
Hi,
I have a question, so you are tapping from the 12v rear socket batt++ (which is powered by leisure batt), where do you connect the negative to? Is there a solid grounding screw mount under this cover? By the picture I see the screws are kind of onto plastic rather than chassis metal.
Thanks
 
Hi @akprincehbd,
There is an earthing point on the right D pillar according to the wiring diagrams, however I think likely inaccessible from the lower cover/area. When needing a 12v supply for some awning LED strips I just tapped into the red (+12v) and brown (0v) wires in the loom which go down to the floor and then across to the rear 12v socket. These are the connections shown in the first of my photos above, rather than the cabling from the solar panel to my XT60 which came afterwards.

Let me know if you have difficulty locating and I'll annotate a photo to highlight.
Thanks,
Actually last night I took off the panel and had a peak inside, I think it does not fit what I wanted to do, basically I have a very big leisure battery around 650AH, so I want to get a high current port interface that I can do a lot of stuff.
1. Bring my alternative portable batt (2kwh) run a dc-dc converter and charge my leisure car batt, so that if after camping my leisure is very low I can use home electricity to top it up rather than fully from alternator (I can't hook up at home). So this port should be handing 600W input charging.​
2. Also sometimes I use xt60 expension port 1 to 8 connection (from RC model) , to power my 2 external 12v compressor fridges also typeC PD charging for multiple devices, so it should handle 500+ Watt.​
After had a look at the panel wire I think they are too thin, so I ended up doing the xt60 port on the leisure battery panel finally last night. It's much closer to the battery so more efficient for big wattage and it's quite convenient as well. I can use my car leisure batt to top up my 2kwh portable leisure batt as well if the SUN is big and my car leisure is full, so not wasting them.

They do look quite neat xD. The reason I use xt60 is that they handle very high current with thick wire (75ah, around 900W) , the normal cigg port connected to leisure can handle max 150-200W so too slow, and they can get hot and loose. With XT60 interface you can modular expension them into whatever you need, charging/discharging whatever you want to play with.


image1 (4).jpegimage0 (8).jpeg
 
BTW I use high quality very flex 10AWG silicon wiring connect this xt60 to the leisure battery inside:
1. Positive - 80A fuse - leisure batt+
2. Negative - to the screw(gnd) holding the battery beneith near the door, so that it can passing through the shunt.
 
Nice job.
I think given the very high currents that you later mentioned it was wise to mount the connector close to the power source with use of adequate cable and fuse. The cable and fusing to the 12V cigar sockets is nowhere near suitable.
Indeed you may find XT90 connectors necessary if you are drawing >60A continuously.
 
Back
Top